In this tutorial, you will learn how to use an HC-SR04 Ultrasonic Sensor with a buzzer and an LED to create a simple distance detection and alert system. When an object gets too close, the buzzer and LED will activate as a warning signal.
This project helps beginners understand how ultrasonic sensors measure distance and how to apply them for object detection, obstacle avoidance, or parking sensors using Arduino.
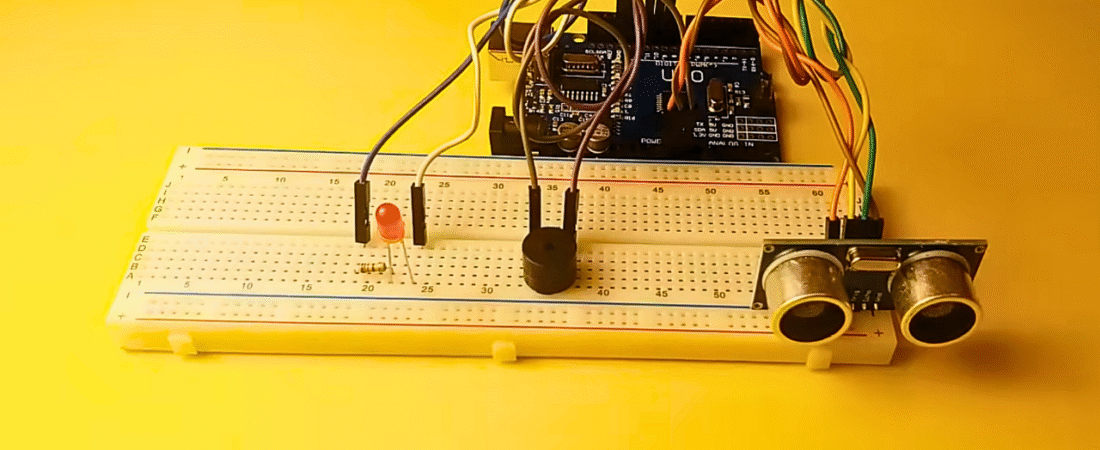
Components Required
- Arduino Uno board
- HC-SR04 Ultrasonic Sensor
- 1 × Buzzer
- 1 × LED
- 1 × 220 Ω resistor
- Breadboard
- Jumper wires
How the HC-SR04 Sensor Works
The HC-SR04 uses ultrasonic sound waves to measure distance. It sends out a pulse from the Trig pin and listens for the echo returning to the Echo pin.
The time difference between sending and receiving the pulse determines the distance to the object.
Speed of sound: 340 m/s = 0.034 cm/µs
Since the signal travels to the object and back, the distance formula is:

Circuit Connections
Ultrasonic Sensor (HC-SR04)
| Sensor Pin | Arduino Connection | Description |
|---|---|---|
| VCC | +5 V | Power supply |
| GND | GND | Ground |
| Trig | Digital pin 9 | Sends ultrasonic pulse |
| Echo | Digital pin 10 | Receives echo signal |
Buzzer
- Long leg (+) → Arduino digital pin 11
- Short leg (–) → Arduino GND
LED
- LED long leg (+) → 220 Ω resistor → Arduino digital pin 13
- LED short leg (–) → GND
Arduino Code
// Using Ultrasonic Sensor HC-SR04 with Buzzer, LED, and Arduino

// Define pins
const int trigPin = 9;
const int echoPin = 10;
const int buzzer = 11;
const int ledPin = 13;

// Variables for distance calculation
long duration;
int distance;
int safetyDistance = 5;  // Distance threshold in cm

void setup() {
  pinMode(trigPin, OUTPUT);   // Trig pin as output
  pinMode(echoPin, INPUT);    // Echo pin as input
  pinMode(buzzer, OUTPUT);    // Buzzer as output
  pinMode(ledPin, OUTPUT);    // LED as output
  Serial.begin(9600);         // Start serial communication
}

void loop() {
  // Clear the trigger pin
  digitalWrite(trigPin, LOW);
  delayMicroseconds(2);

  // Send ultrasonic pulse
  digitalWrite(trigPin, HIGH);
  delayMicroseconds(10);
  digitalWrite(trigPin, LOW);

  // Read the echo pin, measure time of sound wave travel
  duration = pulseIn(echoPin, HIGH);

  // Calculate distance in cm
  distance = duration * 0.034 / 2;

  // Print distance in Serial Monitor
  Serial.print("Distance: ");
  Serial.print(distance);
  Serial.println(" cm");

  // Safety distance alert
  if (distance <= safetyDistance) {
    digitalWrite(buzzer, HIGH);  // Turn buzzer ON
    digitalWrite(ledPin, HIGH);  // Turn LED ON
  } else {
    digitalWrite(buzzer, LOW);   // Turn buzzer OFF
    digitalWrite(ledPin, LOW);   // Turn LED OFF
  }

  delay(200);  // Small delay for stable readings
}
Code Explanation
- Pin Setup:
The Trig and Echo pins are configured for output and input, respectively. - Trigger Signal:
The Trig pin sends a 10 µs pulse to start measurement. - Echo Reading:
The Echo pin receives the reflected sound wave and measures travel time. - Distance Calculation:
Converts sound travel time to distance in centimeters usingduration * 0.034 / 2. - Safety Check:
If an object is closer than the set threshold (5 cm), both the LED and buzzer activate.
Testing the Circuit
- Upload the code to your Arduino.
- Open Serial Monitor (9600 baud).
- Move an object slowly toward the sensor.
- Watch the readings — when the distance drops below 5 cm, both LED and buzzer turn ON.
Applications
- Obstacle detection systems for robots
- Parking assistance sensors
- Smart distance warning systems
- Automated object counters
Pro Tips
- You can adjust
safetyDistanceto make the buzzer trigger earlier or later. - For a smoother alert, use the
tone()function to create variable beep sounds based on distance. - Mount the HC-SR04 at a fixed position to get stable measurements.
Conclusion
This project is a great way to understand how ultrasonic sensors work with Arduino. By combining the HC-SR04, a buzzer, and an LED, you’ve created a simple but functional proximity alert system — the same principle used in parking sensors and robot navigation.
Bir yanıt yazın