In this tutorial, we’ll learn how to build an Arduino XY Plotter Drawing Robot, also known as a Polargraph. This DIY machine can draw detailed vector images or text on a wall, whiteboard, or A4 paper — just like a vertical CNC plotter.
By the end of this guide, you’ll know how to:
✅ Assemble the mechanical setup
✅ Connect and wire the electronics
✅ Install and configure the software (Arduino + Processing + Polargraph Controller)
✅ Upload vector drawings and start automatic plotting
Required Hardware
| Component | Description |
|---|---|
| Arduino Uno or Mega | Main control board |
| L293D Motor Driver Shield | Controls two stepper motors |
| 2 × L293D Motor Driver IC | Mounted on shield |
| 2 × NEMA17 Stepper Motor | Drives belts |
| MG90S Servo Motor | Lifts and lowers pen |
| GT2 Pulley (16 teeth) | Belt coupling |
| GT2 Rubber Belt (5 m) | Transmission belt |
| 5V–12V Power Supply | External power (min 2A recommended) |
| Marker Pen | For drawing |
| Weight (e.g. 4xAA batteries) | Balancing gondola |
| Jumper Wires | Connections |
| Wooden Frame or Whiteboard | Drawing surface |
Optional (if 3D printer available)
- 3D Printed Gondola (pen holder)
- 3D Printed Stepper Motor Mounts
📦 Download ready-to-print 3D models:
- Gondola: Thingiverse – Polargraph Gondola
- Stepper Bracket: Thingiverse – Stepper Mount
Mechanical Assembly
1️⃣ Mount the Stepper Motors
Attach the NEMA17 stepper motors at the top-left and top-right corners of your board using the 3D brackets.
2️⃣ Attach the Belts
- Loop the GT2 belts through both pulleys and connect the ends to the gondola.
- Ensure both belts are tensioned evenly.
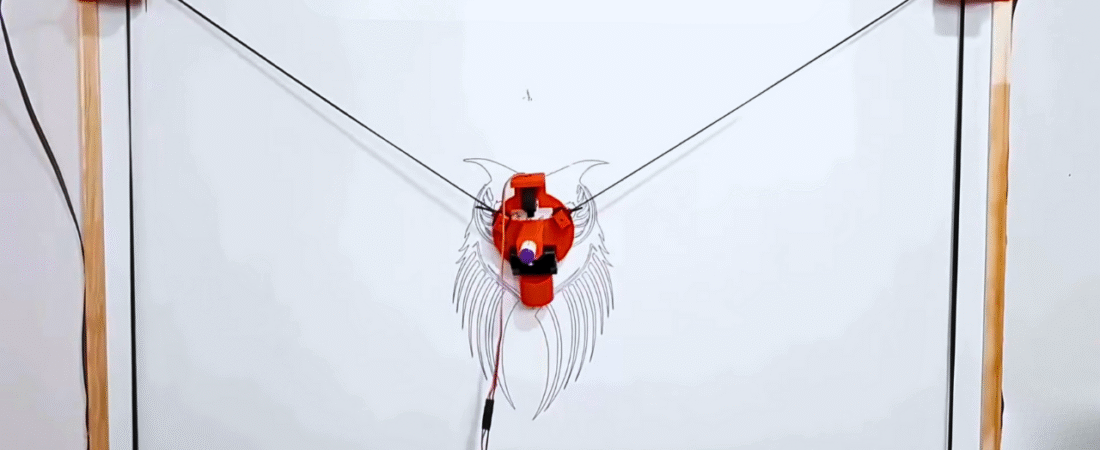
3️⃣ Install the Gondola
- Fix the MG90S servo motor to the gondola.
- Mount your marker pen onto the gondola — ensure it can move up/down freely.
4️⃣ Add Counterweight
Attach a small weight (e.g., 4xAA batteries) at the other end of the belts to stabilize movement.
Electrical Connections
| Device | Connection |
|---|---|
| Stepper Motor A | Motor Shield M1 + M2 |
| Stepper Motor B | Motor Shield M3 + M4 |
| Servo Motor Signal | Digital Pin 9 |
| Servo VCC | +5V |
| Servo GND | GND |
| Power Supply | External 6–12V to motor shield VIN/GND |
💡 Tip: Always use an external power supply for the motors (not USB). This prevents voltage drops during long drawing sessions.
Understanding Polargraph Concept
The Polargraph works by calculating the distance between two stepper motors and the gondola position.
When both motors rotate, the gondola moves across the surface following vector coordinates sent from a computer.
Software Setup
Step 1. Install Arduino IDE
Download and install the Arduino IDE (v1.8.5 or later):
👉 Arduino IDE Old Versions
Step 2. Install Processing
Processing is used to run the Polargraph Controller (the software that sends drawing commands).
👉 Download Processing v2.2.1 or newer: Processing.org/download
Step 3. Download Polargraph Software
Get the latest Polargraph bundle from GitHub:
👉 PolargraphController Releases
After extracting, you’ll find two main folders:
arduino-source/
processing-source/
Step 4. Setup Arduino Code
1️⃣ Copy libraries fromarduino-source/libraries/ → to your Arduino libraries folder.
2️⃣ Copy the firmware folderarduino-source/polargraph_server_a1 → to your Arduino sketchbook folder.
3️⃣ Open Arduino IDE → File → Sketchbook → polargraph_server_a1
This will open all 14 source files automatically.
4️⃣ Verify and Upload the code to your Arduino Uno/Mega.
Once uploaded, open Serial Monitor at 57600 baud — you should see “READY” repeating every few seconds.
✅ This confirms the firmware is installed correctly.
Step 5. Setup Processing Controller
1️⃣ In Processing, locate your sketchbook folder (File → Preferences).
2️⃣ Copy the folder polargraphcontroller from the downloaded processing-source to this sketchbook path.
3️⃣ Also, copy the three library folders into your Processing libraries folder.
4️⃣ Restart Processing → File → Sketchbook → polargraphcontroller → Run.
Configure Machine Dimensions
In the Polargraph Controller window:
| Setting | Description |
|---|---|
| Machine Width | Distance between two pulleys |
| Machine Height | Distance from pulley axis to bottom of drawing area |
| Page Area | Size of your drawing paper or panel |
| Home Point | 120 mm below the top midpoint (centerline) |
1️⃣ Go to Setup tab
2️⃣ Enter your machine width and height
3️⃣ Define page area (A4, wall, etc.)
4️⃣ Click Center Page, then set Page Pos Y = 120
5️⃣ Click Center Home Point, then set Home Pos Y = 120
Stepper and Servo Settings
| Setting | Example |
|---|---|
| MM Per Rev | 32 (GT2 belt = 2 mm × 16 teeth) |
| Steps Per Rev | 400 (for 1.8° stepper motor × 2 motors) |
| Pen Up Position | 90° (servo lifted) |
| Pen Down Position | 60° (servo lowered) |
After setting:
- Click Serial Port and select Arduino’s port.
- When connected, the status turns green.
- Test pen control:
- Click Upload Lift Range
- Click Test Lift Range
Drawing Your First Vector
1️⃣ Click Set Home, manually move the gondola to the predefined home point.
2️⃣ Click Set Pen Position.
3️⃣ Click Set Area → Define the drawing region.
4️⃣ Click Set Frame to Area.
Now, load your design:
- Convert your image to SVG format (e.g., via Online SVG Converter).
- In Polargraph Controller, click Load Vector.
- Resize and position using Resize Vector and Move Vector tools.
- Finally, click Draw Vector to start plotting!
💡 The Processing controller communicates with the Arduino firmware using serial commands to control both steppers and the pen servo.
⚠️ Troubleshooting Tips
- If motors stutter: reduce speed or check belt tension.
- If “READY” doesn’t appear: check baud rate (57600) and COM port.
- Use a 12V 2A+ power supply for best torque.
- Keep belts tight and balanced for accurate drawings.
Conclusion
You’ve built a fully functional Arduino XY Plotter Drawing Robot (Polargraph)!
This project combines mechanics, coding, and art — capable of sketching portraits, vector art, and geometric patterns.
🛠️ Experiment with:
- Different pen types (markers, chalk, paint pens)
- Custom frame sizes
- Multi-color swapping mechanisms
Bir yanıt yazın