Sound sensors are simple yet powerful devices that can detect noise levels in their surroundings. In this project, we’ll build a sound-activated LED light system using an Arduino Uno and a sound detection sensor. When the sensor detects a clap, loud noise, or beat from music, it will automatically turn the LED on or off.
This type of project is a great introduction to sound-based automation systems, and can be extended to create clap-controlled lamps, music-reactive lights, or sound-triggered devices.
Hardware Required
- Arduino Uno board
- Sound sensor module (with LM393 comparator)
- 1 LED
- 220Ω resistor
- Breadboard
- Jumper wires
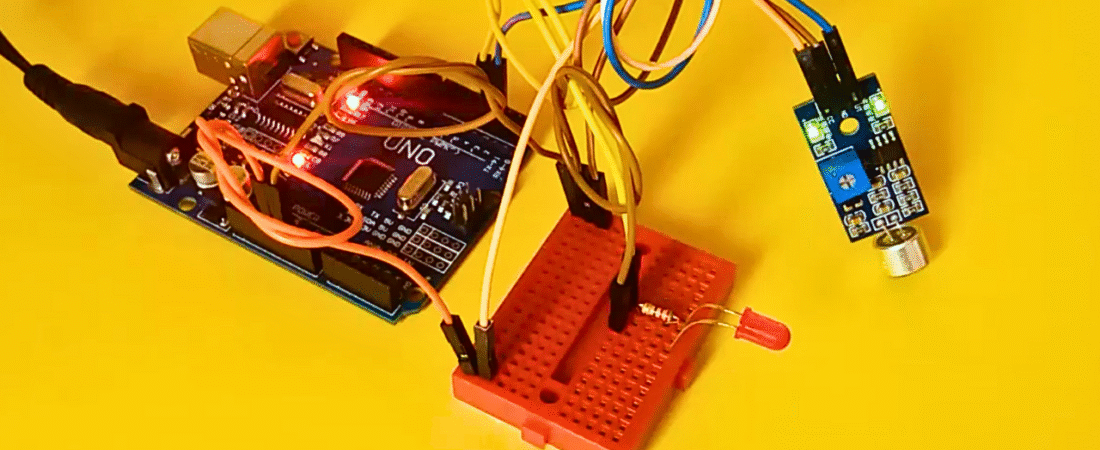
Circuit
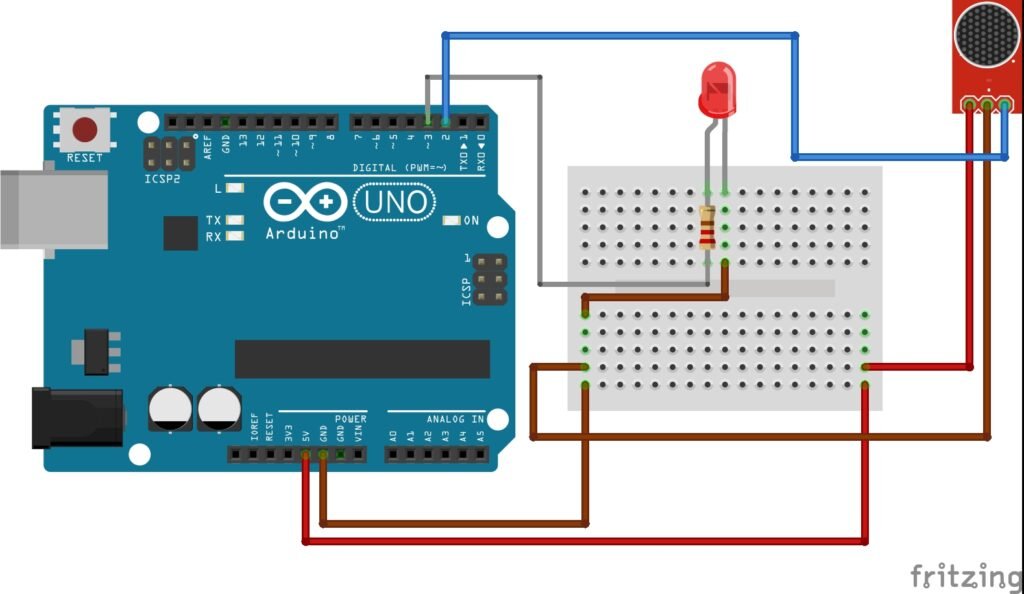
Circuit Connections
- VCC (Sound Sensor) → 5V on Arduino
- GND (Sound Sensor) → GND on Arduino
- OUT (Sound Sensor) → Digital Pin 2
- LED Anode (+) → Digital Pin 3 (through 220Ω resistor)
- LED Cathode (-) → GND
How the Circuit Works
The sound sensor module detects changes in sound levels using its built-in microphone and LM393 op-amp comparator. The sensor has an onboard potentiometer that adjusts the sensitivity threshold. When the sound level exceeds this threshold, the sensor’s output pin goes HIGH.
In this project:
- The sensor output is connected to digital pin 2 of the Arduino.
- The LED is connected to digital pin 3 through a 220Ω resistor.
- When sound is detected (clap or noise), Arduino receives a HIGH signal and turns the LED ON.
- When there is no sound, the LED remains OFF.
Important Note:
Some sound sensors have “Active High” output (signal pin goes HIGH when sound is detected), while others have “Active Low”. If your LED behaves inversely (lights up when quiet), simply swap the logic condition in the code.
Code
int soundSensor = 2;  // Sound sensor output connected to digital pin 2
int LED = 3;          // LED connected to digital pin 3

void setup() {
  pinMode(soundSensor, INPUT);  // Set sound sensor pin as input
  pinMode(LED, OUTPUT);         // Set LED pin as output
}

void loop() {
  int statusSensor = digitalRead(soundSensor);  // Read sound sensor state

  if (statusSensor == 1) {      // If sound detected
    digitalWrite(LED, HIGH);    // Turn LED ON
  }
  else {
    digitalWrite(LED, LOW);     // Turn LED OFF
  }
}
How It Works
- The sound sensor continuously monitors the surrounding sound levels.
- When a loud noise (like a clap or tap) occurs, the LM393 comparator triggers the output pin to HIGH.
- Arduino detects this HIGH signal and lights up the LED.
- Once the noise drops below the threshold, the output goes LOW and the LED turns off.
You can fine-tune the sensitivity of the sound sensor by rotating the onboard potentiometer — clockwise increases sensitivity, counterclockwise decreases it.
Project Tips and Enhancements
- Replace the single LED with an LED strip or relay module to control lamps or fans.
- Combine with a delay or toggle logic to make a “clap ON / clap OFF” lamp.
- Add a serial monitor to display sound detection events for debugging.
- Enclose the circuit in a small case to make a neat, compact sound-activated device.
Conclusion
This project demonstrates a simple yet practical use of a sound sensor — controlling an LED with sound. With minimal components and wiring, you can explore how sensors communicate with microcontrollers and build creative sound-responsive systems.
This beginner-friendly project is a perfect foundation for interactive sound-reactive electronics and home automation applications.
Bir yanıt yazın