n this tutorial, you’ll learn how to play a melody on a buzzer using Arduino when a button is pressed. This project uses the tone() function to generate musical notes and demonstrates how to use external input (a button) to trigger sound output.
It’s a fun and educational way to explore digital inputs, tone generation, and melody timing — perfect for beginners or makers who want to experiment with sound.
Hardware Required
- Arduino Uno board
- Piezo buzzer (or small passive buzzer)
- Push button
- 10kΩ resistor (for pull-down circuit)
- Breadboard
- Jumper wires
How It Works
When the button is pressed, Arduino plays a short melody through the buzzer. Each musical note corresponds to a specific frequency (in hertz), and the tone() function is used to output that frequency on the buzzer pin.
The melody is stored in arrays (melody[] and noteDurations[]) and plays sequentially when the button input is detected.
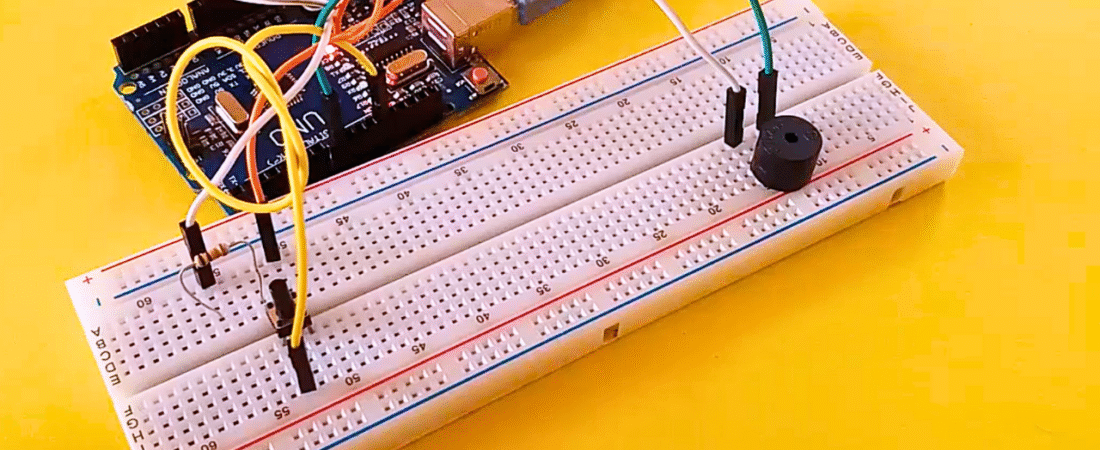
Circuit Explanation
1. Buzzer Connection
- Connect the buzzer’s positive leg (+) to digital pin 8 on Arduino.
- Connect the negative leg (-) to GND.
2. Button Connection
- Place the push button on the breadboard.
- Connect one side of the button to +5V.
- Connect the other side to digital pin 12 on the Arduino.
- Also connect a 10kΩ resistor between the button’s ground side and GND — this acts as a pull-down resistor, keeping the signal LOW when the button is not pressed.
Circuit Summary Table
| Component | Connection |
|---|---|
| Buzzer (+) | Arduino pin 8 |
| Buzzer (–) | GND |
| Button leg 1 | +5V |
| Button leg 2 | Pin 12 |
| 10kΩ resistor | Between button leg 2 and GND |
Arduino Code
Below is the fully corrected and working code.
This version includes the pitches.h library — a file that defines all note frequencies.
Step 1: Create the pitches.h File
Before uploading the main sketch, you need to create a file named pitches.h in the same Arduino project folder.
Copy this into pitches.h:
#define NOTE_B0  31
#define NOTE_C1  33
#define NOTE_CS1 35
#define NOTE_D1  37
#define NOTE_DS1 39
#define NOTE_E1  41
#define NOTE_F1  44
#define NOTE_FS1 46
#define NOTE_G1  49
#define NOTE_GS1 52
#define NOTE_A1  55
#define NOTE_AS1 58
#define NOTE_B1  62
#define NOTE_C2  65
#define NOTE_CS2 69
#define NOTE_D2  73
#define NOTE_DS2 78
#define NOTE_E2  82
#define NOTE_F2  87
#define NOTE_FS2 93
#define NOTE_G2  98
#define NOTE_GS2 104
#define NOTE_A2  110
#define NOTE_AS2 117
#define NOTE_B2  123
#define NOTE_C3  131
#define NOTE_CS3 139
#define NOTE_D3  147
#define NOTE_DS3 156
#define NOTE_E3  165
#define NOTE_F3  175
#define NOTE_FS3 185
#define NOTE_G3  196
#define NOTE_GS3 208
#define NOTE_A3  220
#define NOTE_AS3 233
#define NOTE_B3  247
#define NOTE_C4  262
#define NOTE_CS4 277
#define NOTE_D4  294
#define NOTE_DS4 311
#define NOTE_E4  330
#define NOTE_F4  349
#define NOTE_FS4 370
#define NOTE_G4  392
#define NOTE_GS4 415
#define NOTE_A4  440
#define NOTE_AS4 466
#define NOTE_B4  494
#define NOTE_C5  523
#define NOTE_CS5 554
#define NOTE_D5  587
#define NOTE_DS5 622
#define NOTE_E5  659
#define NOTE_F5  698
#define NOTE_FS5 740
#define NOTE_G5  784
#define NOTE_GS5 831
#define NOTE_A5  880
#define NOTE_AS5 932
#define NOTE_B5  988
#define NOTE_C6  1047
#define NOTE_CS6 1109
#define NOTE_D6  1175
#define NOTE_DS6 1245
#define NOTE_E6  1319
#define NOTE_F6  1397
#define NOTE_FS6 1480
#define NOTE_G6  1568
#define NOTE_GS6 1661
#define NOTE_A6  1760
#define NOTE_AS6 1865
#define NOTE_B6  1976
#define NOTE_C7  2093
#define NOTE_CS7 2217
#define NOTE_D7  2349
#define NOTE_DS7 2489
#define NOTE_E7  2637
#define NOTE_F7  2794
#define NOTE_FS7 2960
#define NOTE_G7  3136
#define NOTE_GS7 3322
#define NOTE_A7  3520
#define NOTE_AS7 3729
#define NOTE_B7  3951
#define NOTE_C8  4186
#define NOTE_CS8 4435
#define NOTE_D8  4699
#define NOTE_DS8 4978
Step 2: Main Sketch (buttonMelody.ino)
#include "pitches.h"  // Include note frequency definitions

int melody[] = {
  NOTE_C4, NOTE_G3, NOTE_G3, NOTE_A3, NOTE_G3, 0, NOTE_B3, NOTE_C4
};

int noteDurations[] = {
  4, 8, 8, 4, 4, 4, 4, 4
};

int buttonPin = 12;   // Button connected to pin 12

void setup() {
  pinMode(buttonPin, INPUT);  // Set button pin as input
}

void loop() {
  int buttonState = digitalRead(buttonPin);  // Read button state

  if (buttonState == HIGH) {  // When button is pressed
    for (int thisNote = 0; thisNote < 8; thisNote++) {

      int noteDuration = 1000 / noteDurations[thisNote];
      tone(8, melody[thisNote], noteDuration);  // Play the note on pin 8

      int pauseBetweenNotes = noteDuration * 1.30;
      delay(pauseBetweenNotes);  // Wait before next note
      noTone(8);  // Stop sound
    }
  }
}
How the Code Works
- The
melody[]array stores the musical notes to play. - The
noteDurations[]array defines how long each note lasts (4 = quarter note, 8 = eighth note). - When the button is pressed, Arduino loops through the melody and plays each note using
tone(pin, frequency, duration). - The pauseBetweenNotes variable ensures each note is clearly separated.
- The
pitches.hfile defines frequencies for standard music notes.
Common Errors and Fixes
- ❌ Error:
fatal error: pitches.h: No such file or directory
✅ Fix: Create a new tab in Arduino IDE (click the down arrow → New Tab → name it pitches.h) and paste the frequency definitions. - ❌ Buzzer always ON or distorted sound:
✅ Ensure your buzzer is a passive buzzer (not an active one). Active buzzers have built-in oscillators and don’t work properly withtone(). - ❌ Button doesn’t respond:
✅ Check your pull-down resistor (10kΩ between button pin and GND). Without it, the input may “float” and read random signals.
Applications
- Simple sound feedback systems
- Interactive projects (toys, alarms, doorbells)
- Custom music projects using multiple melodies
Conclusion
You’ve now built a working Arduino Button Buzzer Melody Project, where pressing a button triggers a predefined melody.
This project introduces you to digital input handling, sound generation, and timing in Arduino, forming a foundation for more advanced projects like music alarms, sound-based games, or interactive art installations.
Bir yanıt yazın