In this tutorial, we’ll build a smart obstacle avoiding robot car using Arduino Uno, L298N motor driver, and an ultrasonic distance sensor.
This project is beginner-friendly and affordable — costing under $20, yet it introduces the fundamentals of autonomous robotics and sensor-based navigation.
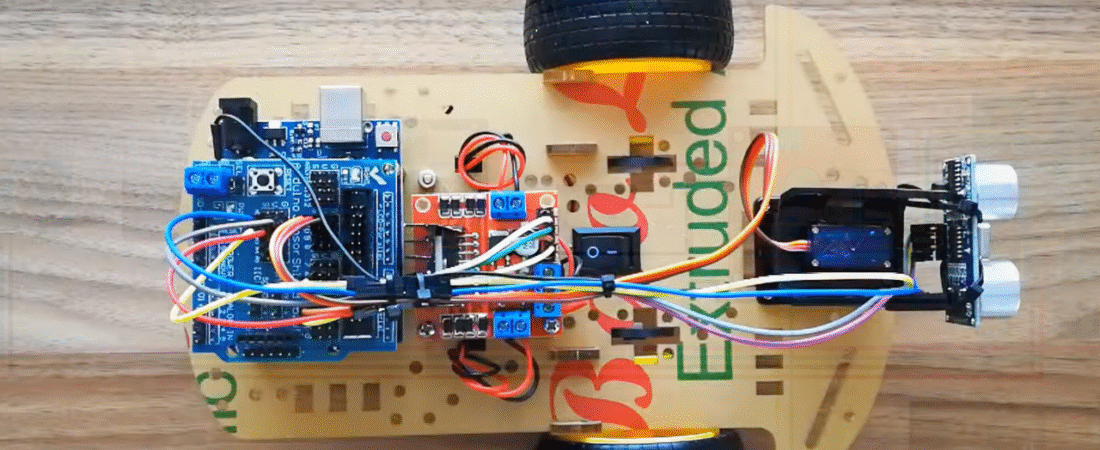
The robot uses an HC-SR04 ultrasonic sensor mounted on a servo motor to detect obstacles in front and to the sides. When it detects an obstacle, it automatically stops and turns toward the clearer direction.
Required Components
| Component | Quantity | Description |
|---|---|---|
| Arduino Uno | 1 | Main controller board |
| L298N Motor Driver Module | 1 | Drives two DC motors |
| HC-SR04 Ultrasonic Sensor | 1 | Detects obstacles |
| SG90 Servo Motor | 1 | Rotates the ultrasonic sensor |
| DC Gear Motor | 2 | Drives the wheels |
| Robot Car Chassis Kit | 1 | Includes wheels, base plate, and screws |
| 4×AA Battery Holder | 1 | Power source for motors |
| 9V Battery + Clip | 1 | Power for Arduino |
| Jumper Wires | Several | For connections |
| Mini Screwdriver, Bolts, Nuts | – | For assembly |
Assembly Steps
1️⃣ Prepare the Chassis
Attach the DC motors to the chassis using the brackets and screws provided in your kit.
Mount the wheels to the motor shafts and install the caster wheel at the rear for balance.
2️⃣ Mount the Sensor
Attach the HC-SR04 ultrasonic sensor to the servo motor holder, then fix the holder on the front of the chassis.
The servo allows the sensor to rotate left and right, scanning for obstacles.
3️⃣ Install the Electronics
Place the Arduino Uno and L298N motor driver on the chassis top plate using spacers or double-sided tape.
Connect the battery holders — one for Arduino (9V) and one for motors (4×AA).
Circuit Connections
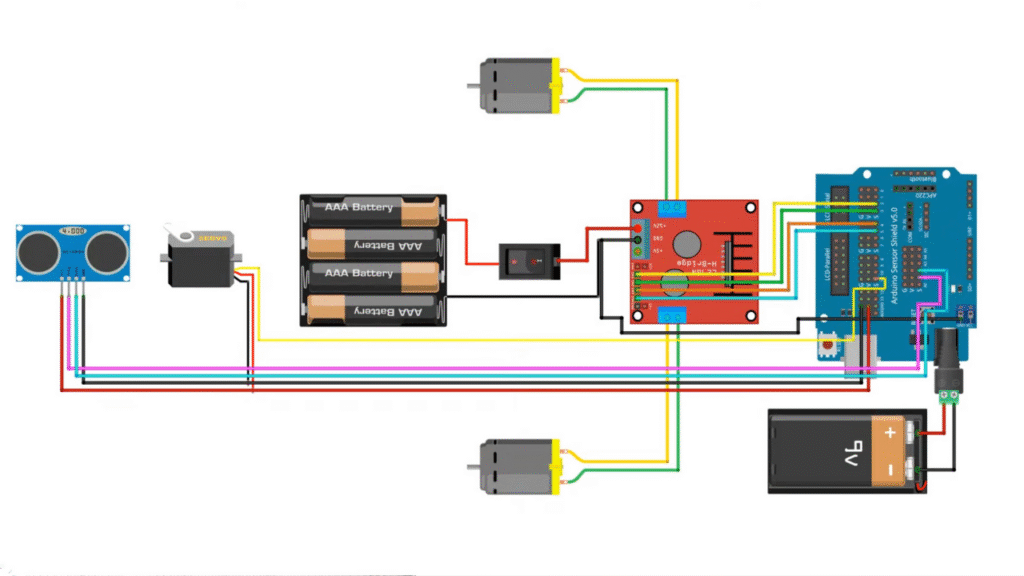
🔹 L298N Motor Driver → Motors
| L298N Pin | Connection |
|---|---|
| OUT1, OUT2 | Left Motor |
| OUT3, OUT4 | Right Motor |
🔹 L298N Motor Driver → Arduino
| L298N Pin | Arduino Pin |
|---|---|
| IN1 | 5 |
| IN2 | 4 |
| IN3 | 3 |
| IN4 | 2 |
| +12V | 4×AA Battery Pack (+) |
| GND | Common GND with Arduino |
| 5V | (Do not connect if using external power) |
🔹 HC-SR04 Ultrasonic Sensor → Arduino
| HC-SR04 Pin | Arduino Pin |
|---|---|
| VCC | +5V |
| GND | GND |
| TRIG | A1 |
| ECHO | A2 |
🔹 SG90 Servo Motor → Arduino
| Servo Pin | Arduino Pin |
|---|---|
| Signal | D11 |
| VCC | +5V |
| GND | GND |
🔹 Power Supply
- Motors: 4×AA batteries connected to L298N +12V input
- Arduino: 9V battery to the barrel jack
- Connect all GNDs together (Arduino, L298N, sensor, and servo)
How It Works
1️⃣ The ultrasonic sensor measures the distance to nearby obstacles.
2️⃣ If an obstacle is detected within 20 cm, the robot stops.
3️⃣ The servo turns left and right, checking for free paths.
4️⃣ The robot compares left and right distances and turns toward the direction with more space.
5️⃣ If no obstacle is detected, it moves forward continuously.
Arduino Code
Before uploading, install the NewPing Library for the ultrasonic sensor:
📦 Download NewPing Library
#include <Servo.h>      // Servo control
#include <NewPing.h>    // Ultrasonic sensor library

// L298N motor driver pins
const int LeftMotorForward = 5;
const int LeftMotorBackward = 4;
const int RightMotorForward = 3;
const int RightMotorBackward = 2;

// Ultrasonic sensor pins
#define trig_pin A1
#define echo_pin A2
#define maximum_distance 200

boolean goesForward = false;
int distance = 100;

NewPing sonar(trig_pin, echo_pin, maximum_distance);
Servo servo_motor;

void setup() {
  pinMode(RightMotorForward, OUTPUT);
  pinMode(LeftMotorForward, OUTPUT);
  pinMode(LeftMotorBackward, OUTPUT);
  pinMode(RightMotorBackward, OUTPUT);

  servo_motor.attach(11);
  servo_motor.write(90);  // Center position
  delay(2000);

  distance = readPing();
  delay(100);
}

void loop() {
  int distanceRight = 0;
  int distanceLeft = 0;
  delay(50);

  if (distance <= 20) {
    moveStop();
    delay(300);
    moveBackward();
    delay(400);
    moveStop();
    delay(300);
    distanceRight = lookRight();
    delay(300);
    distanceLeft = lookLeft();
    delay(300);

    if (distanceRight >= distanceLeft) {
      turnRight();
      moveStop();
    } else {
      turnLeft();
      moveStop();
    }
  } else {
    moveForward();
  }
  distance = readPing();
}

int lookRight() {
  servo_motor.write(10);
  delay(500);
  int distance = readPing();
  servo_motor.write(90);
  delay(100);
  return distance;
}

int lookLeft() {
  servo_motor.write(170);
  delay(500);
  int distance = readPing();
  servo_motor.write(90);
  delay(100);
  return distance;
}

int readPing() {
  delay(70);
  int cm = sonar.ping_cm();
  if (cm == 0) {
    cm = 250; // Default if no reading
  }
  return cm;
}

void moveStop() {
  digitalWrite(LeftMotorForward, LOW);
  digitalWrite(LeftMotorBackward, LOW);
  digitalWrite(RightMotorForward, LOW);
  digitalWrite(RightMotorBackward, LOW);
}

void moveForward() {
  if (!goesForward) {
    goesForward = true;
    digitalWrite(LeftMotorForward, HIGH);
    digitalWrite(RightMotorForward, HIGH);
    digitalWrite(LeftMotorBackward, LOW);
    digitalWrite(RightMotorBackward, LOW);
  }
}

void moveBackward() {
  goesForward = false;
  digitalWrite(LeftMotorForward, LOW);
  digitalWrite(RightMotorForward, LOW);
  digitalWrite(LeftMotorBackward, HIGH);
  digitalWrite(RightMotorBackward, HIGH);
}

void turnRight() {
  digitalWrite(LeftMotorForward, HIGH);
  digitalWrite(RightMotorBackward, HIGH);
  digitalWrite(RightMotorForward, LOW);
  digitalWrite(LeftMotorBackward, LOW);
  delay(500);
}

void turnLeft() {
  digitalWrite(RightMotorForward, HIGH);
  digitalWrite(LeftMotorBackward, HIGH);
  digitalWrite(LeftMotorForward, LOW);
  digitalWrite(RightMotorBackward, LOW);
  delay(500);
}
Code Explanation (Step-by-Step)
1️⃣ Libraries:
Servo.hcontrols the SG90 servo movement.NewPing.hhandles precise ultrasonic distance measurement.
2️⃣ Motor Logic:
- Forward = Left and Right motors rotate forward.
- Backward = Both motors rotate backward.
- Left Turn = Left motor stops or reverses, right motor forward.
- Right Turn = Right motor stops or reverses, left motor forward.
3️⃣ Decision Process:
- If distance < 20 cm, stop and check both sides.
- Compare right and left sensor readings.
- Move toward the direction with more space.
Power Tips
- Servo jittering? Use a dedicated 5V supply for servo and connect grounds.
- Motors weak? Use NiMH rechargeable batteries instead of carbon-zinc.
- Random resets? Add a 100 µF capacitor near the L298N power input.
How to Test
1️⃣ Upload the code to your Arduino Uno.
2️⃣ Power the car with both battery packs.
3️⃣ Place the robot in an open space.
4️⃣ Observe how it moves forward and avoids obstacles by turning autonomously.
Conclusion
You’ve successfully built an Arduino Obstacle Avoiding Robot Car powered by L298N and HC-SR04!
This simple yet powerful project teaches the basics of:
- Autonomous robotics
- Ultrasonic distance sensing
- Servo-based scanning
- Motor driver control
Bir yanıt yazın